
DCF Valuations
Overview
Modeloptic has built-in support for Discounted Cash Flow (DCF) valuation analysis, using either the Exit Multiple or Terminal Growth Rate terminal value methodologies.
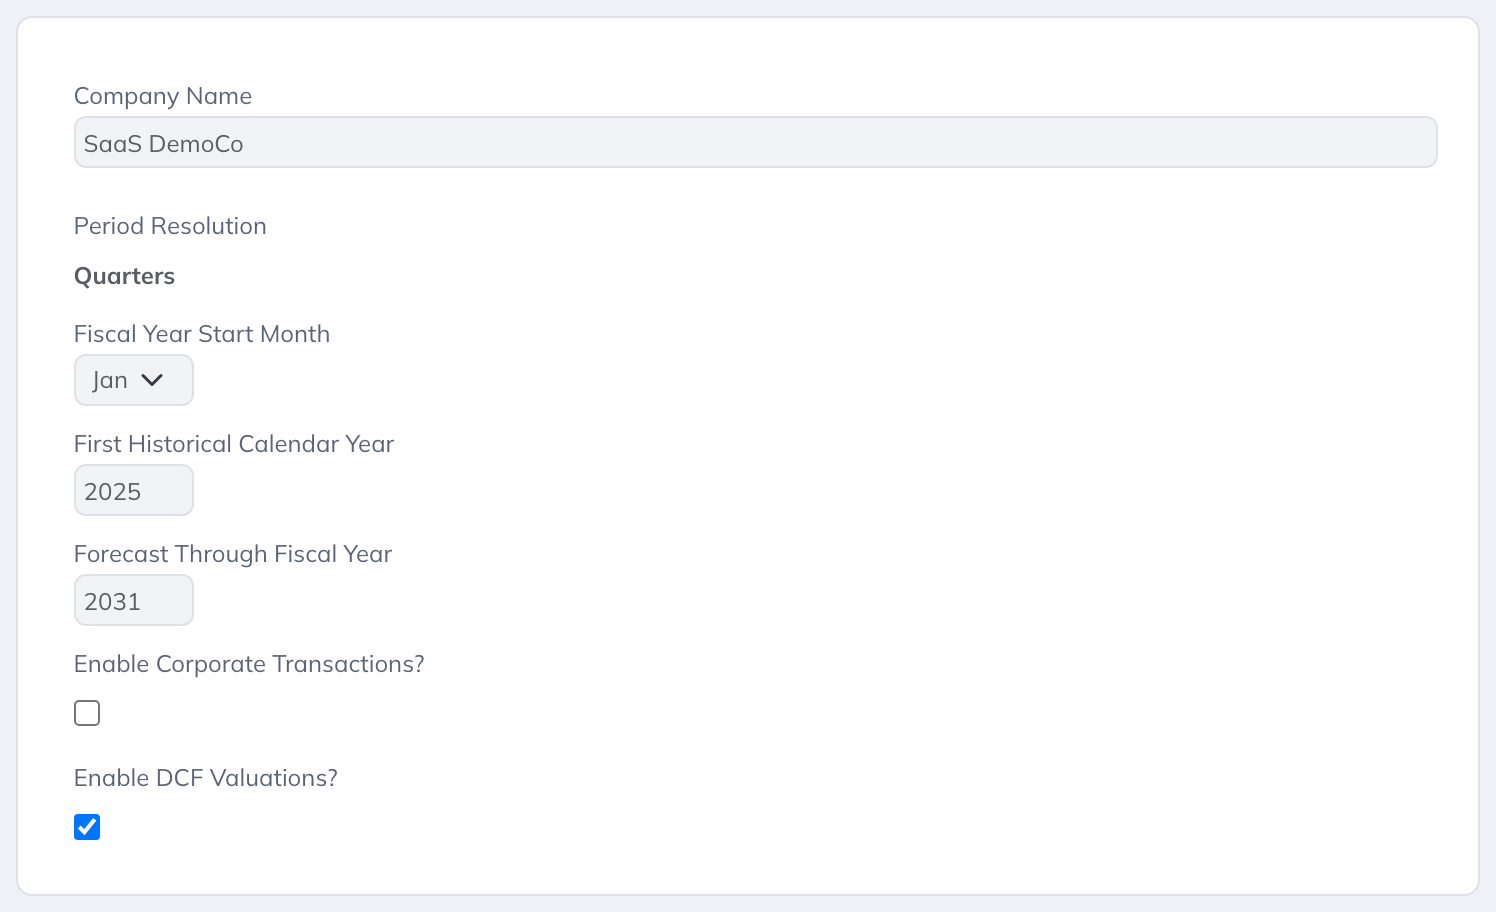
To add DCF valuation capability to your instance, go to the Company Configuration page and check the box for "Enable DCF Valuations?". After saving, a new "DCF" link will appear in the header.

When no DCFs exist yet, the DCF page offers the two preset starting points:
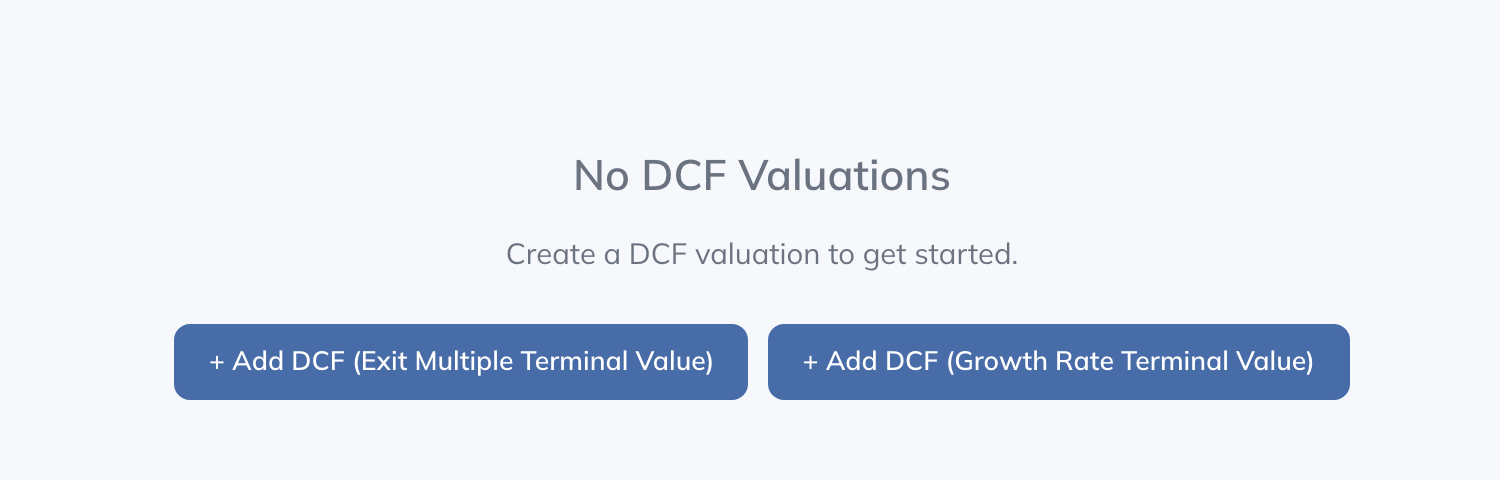
Clicking the "Add" button on the tab bar creates a new DCF model for your instance, pre-populated with standard baseline logic and assumptions. Enter edit mode to alter any of the assumptions or Free Cash Flow calculations as desired.
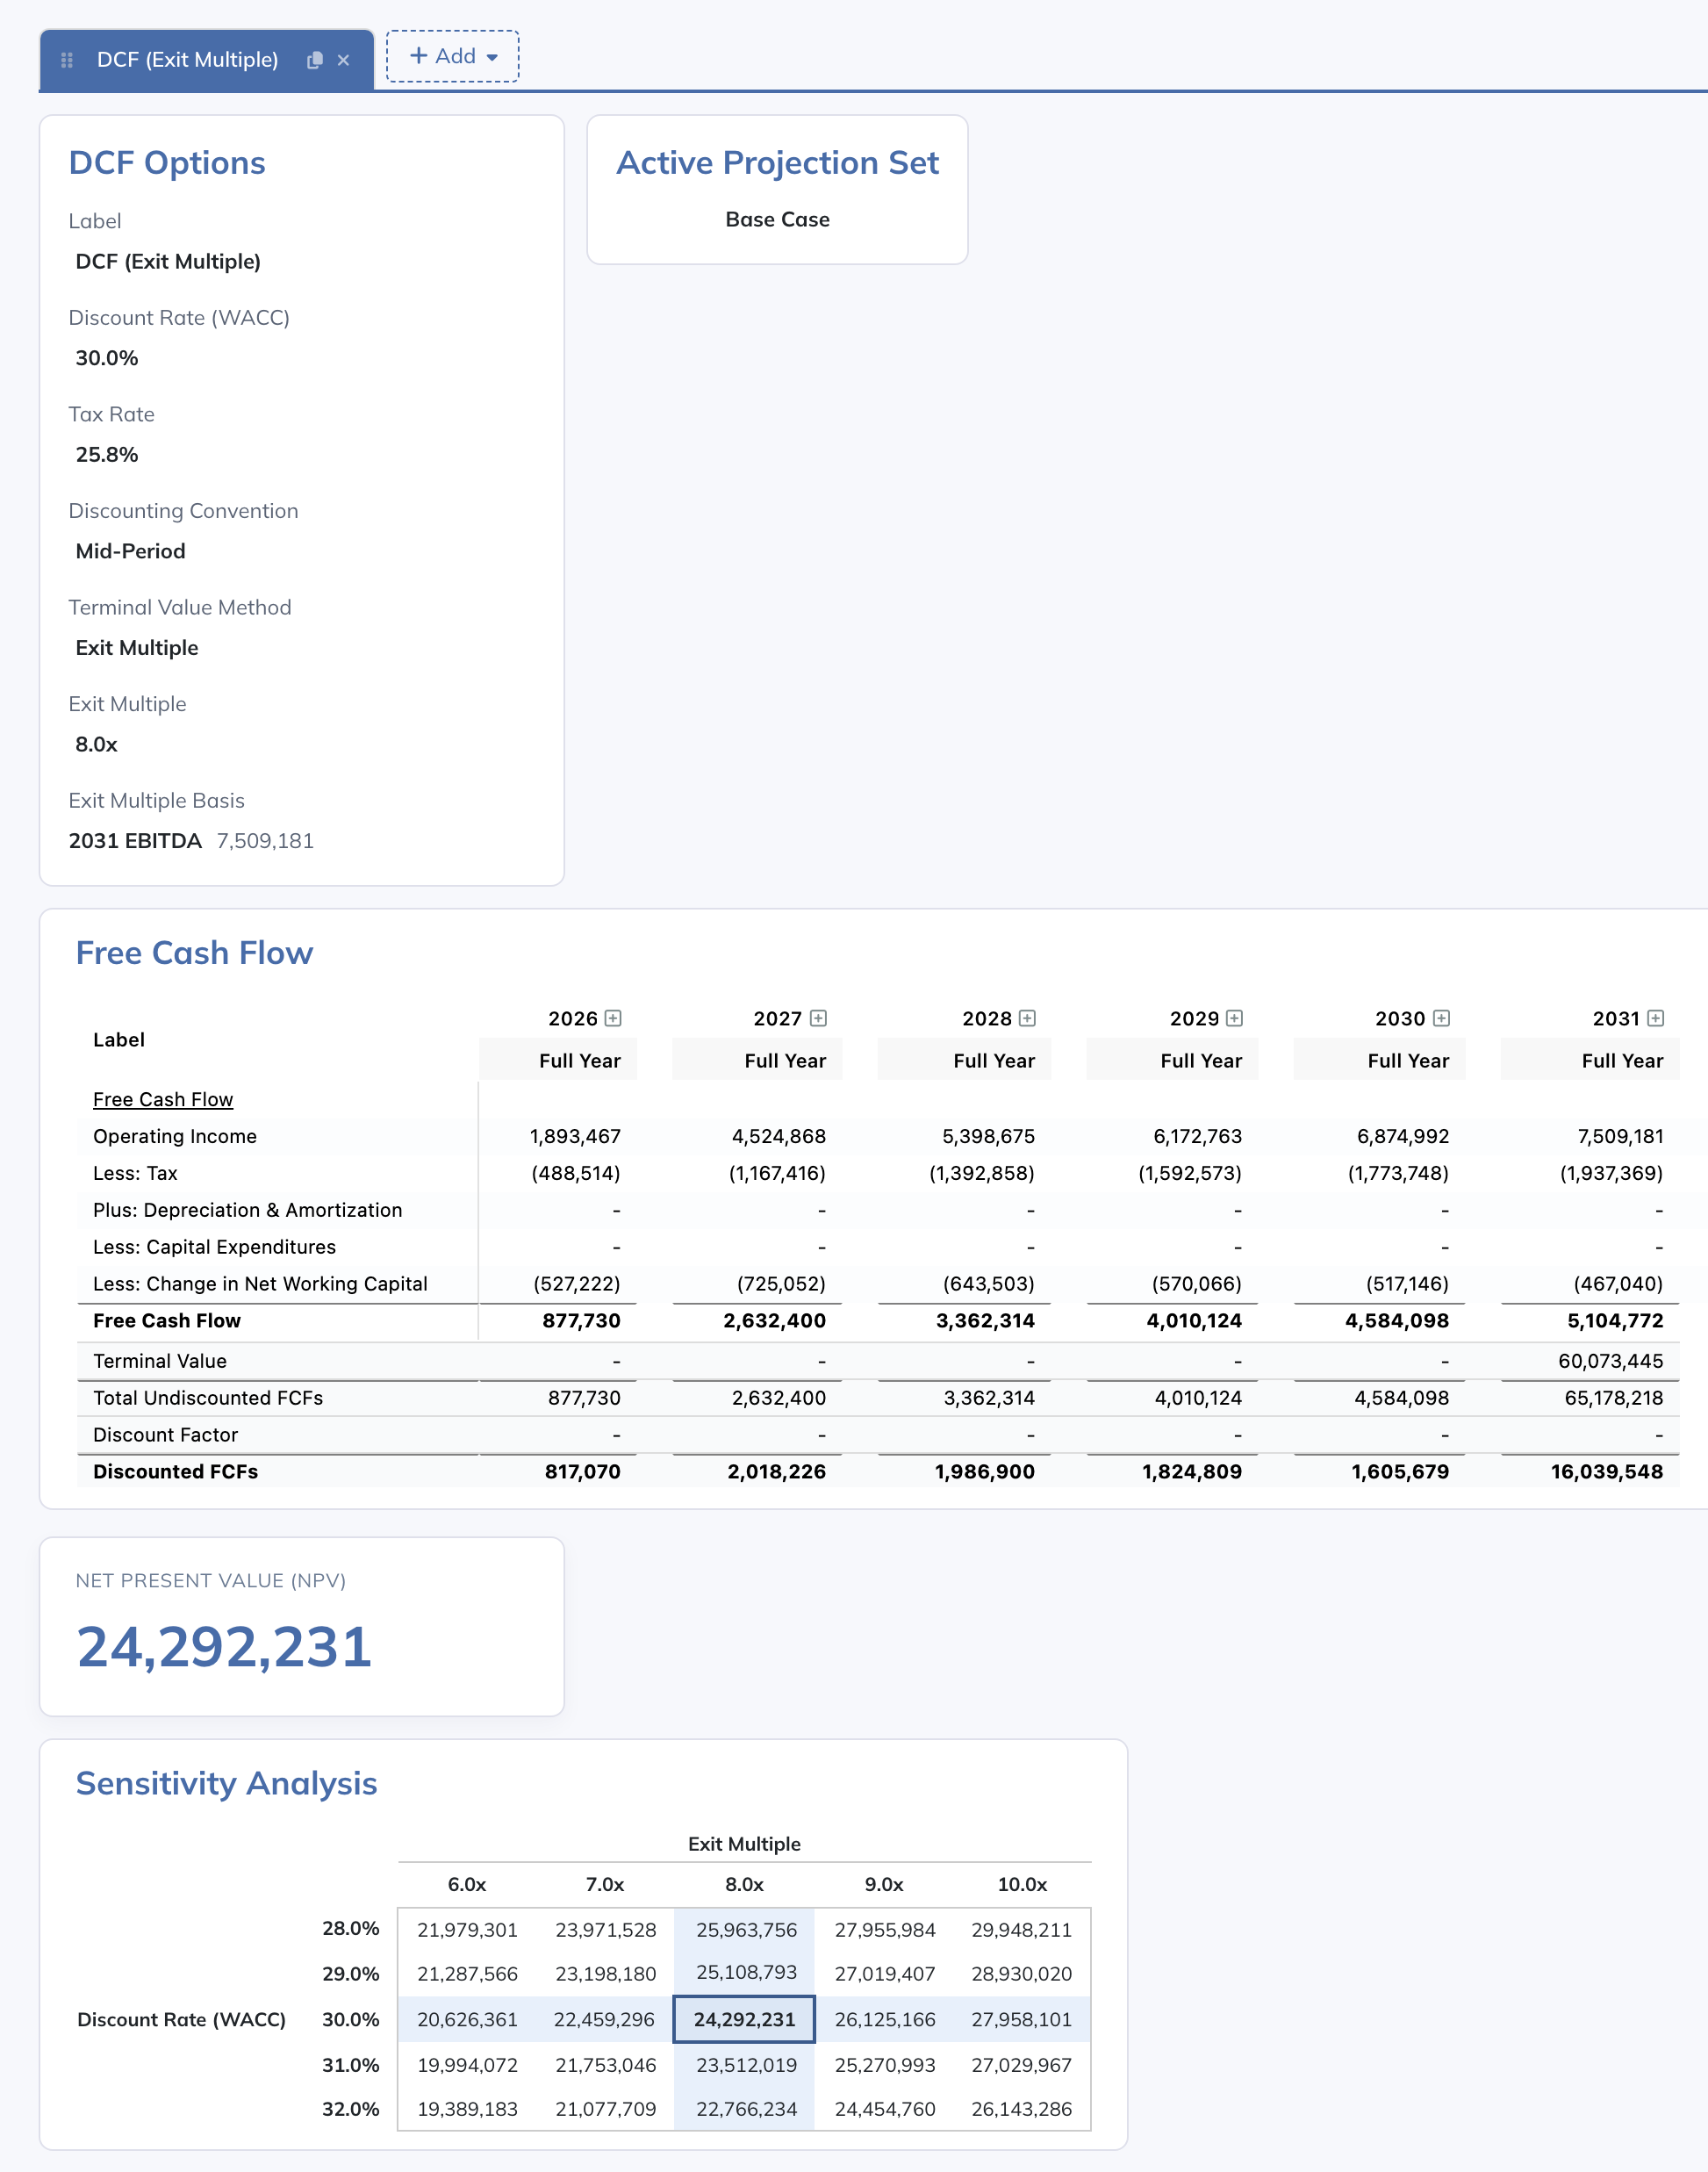
When you first create a new DCF, the D&A, CapEx, and Net Working Capital calculations are inserted for you automatically based on your chart of accounts settings at the time of creation. If you later alter your chart of accounts in a way that would affect these calculations, you'll need to update them accordingly (or create a new DCF).
DCF Valuations can be edited by admins and by users with Model → View & Edit permission.
DCFs are not confined to a particular Projection Set - values are calculated based on the currently active Projection Set, shown in the Active Projection Set card at the top of the page. In a multi-entity company instance, DCFs exist at the instance level, not the entity level, and the free cash flow calculations can be linked to any entity.
The DCF page is organized into:
- Tabs - each tab represents a separate DCF scenario (e.g. different discount rates or terminal value assumptions).
- DCF Options - core parameters like discount rate and terminal value method.
- Free Cash Flow Table - the main grid where you define and calculate free cash flow line items across periods. Historical periods and options are excluded (only projected periods are utilized in DCF calculations), and you must indicate in the "FCF" column which row contains the final Free Cash Flow calculation used in the NPV calculation.
- NPV & Sensitivity Analysis - the computed net present value and a sensitivity matrix showing how NPV changes with different assumptions.
The enable checkbox is shown only for an AI-enabled company with the applicable account access. Configuration access is needed to change it; enabling the feature does not override Model or company permissions.
Managing DCF Scenarios
You can create multiple DCF scenarios, each with its own assumptions and free cash flow projections.
Creating a DCF - click the "+" (Add) button on the tab bar to open a dropdown with two preset options:
- Exit Multiple Terminal Value - creates a DCF pre-configured to use the Exit Multiple terminal value method.
- Growth Rate Terminal Value - creates a DCF pre-configured to use the Terminal Growth Rate method.
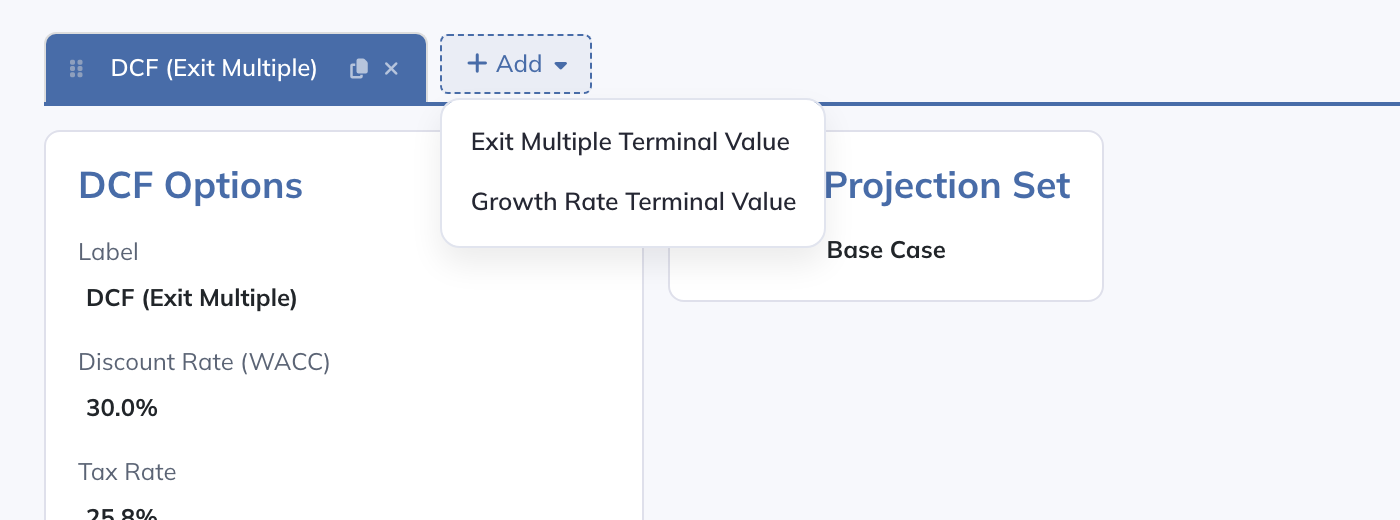
Cloning - click the copy icon on any DCF tab to duplicate it, including all options, rows, and formulas.
Deleting - click the "X" icon on a DCF tab. A confirmation dialog will appear before the DCF is removed.
Reordering - drag and drop DCF tabs to rearrange them.
Click any tab to switch between DCF scenarios.
DCF Options
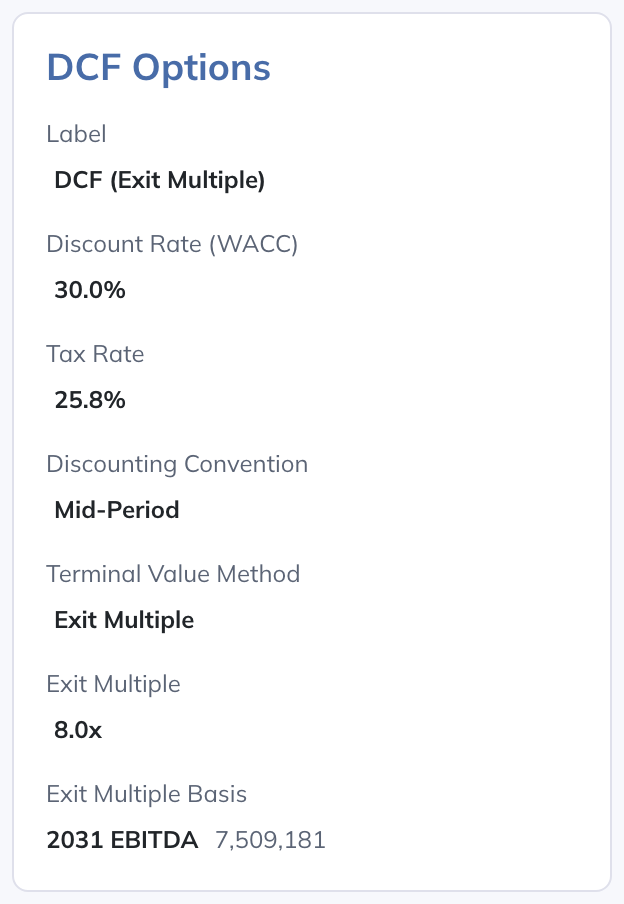
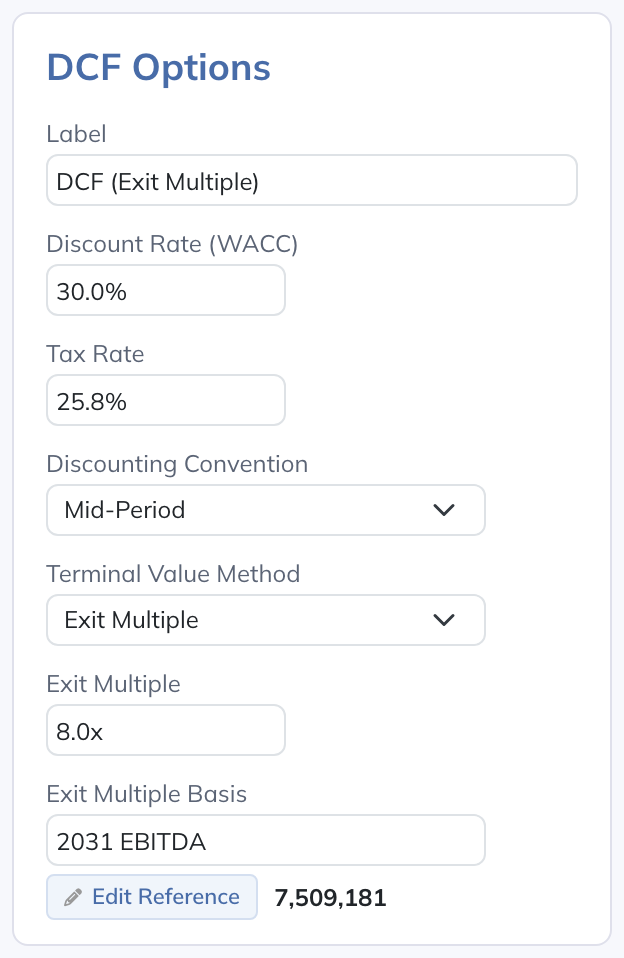
The DCF Options card controls the core parameters for each scenario:
- Label - the name of your DCF scenario.
- Discount Rate (WACC) - accepts a decimal such as 0.10 or an explicit percentage such as 10%. This rate is used to discount future cash flows to their present value.
- Tax Rate - accepts a decimal such as 0.258 or an explicit percentage such as 25.8%. This is an optional scenario-level parameter that can be referenced in Free Cash Flow Table formulas via the DCF Options section of the formula editor (shown as "DCF: Tax Rate"). This allows you to apply a consistent tax rate across your FCF build-up without hardcoding it into individual formulas.
- Discounting Convention - controls when during each period cash flows are assumed to occur, which affects the discount factor exponent:
- Mid-Period (default) - assumes cash flows occur at the midpoint of each period. For positive cash flows and a positive discount rate, earlier assumed receipt produces a higher present value than end-of-period discounting.
- End-of-Period - assumes cash flows occur at the end of each period. Its effect depends on cash-flow signs and the discount rate; it is not inherently more conservative for every cash-flow pattern.
- Terminal Value Method - choose between two approaches:
- Exit Multiple - calculates terminal value as a multiple of the final period's basis value. When selected, two additional fields appear: Exit Multiple (the multiplier) and Basis (a formula referencing a row from your model, e.g. EBITDA). The basis formula is written using the same formula editor described below.
- Terminal Growth Rate - calculates terminal value using a perpetuity growth model. When selected, the Terminal Growth Rate field appears (accepts 0.02 or an explicit 2%).
- FCF Row - select which row in the Free Cash Flow Table represents the final free cash flow figure used for the NPV calculation. This is set via a radio button on the desired row in the Table.
The card shows the current parameters in view mode; in edit mode they become editable:
Free Cash Flow Table
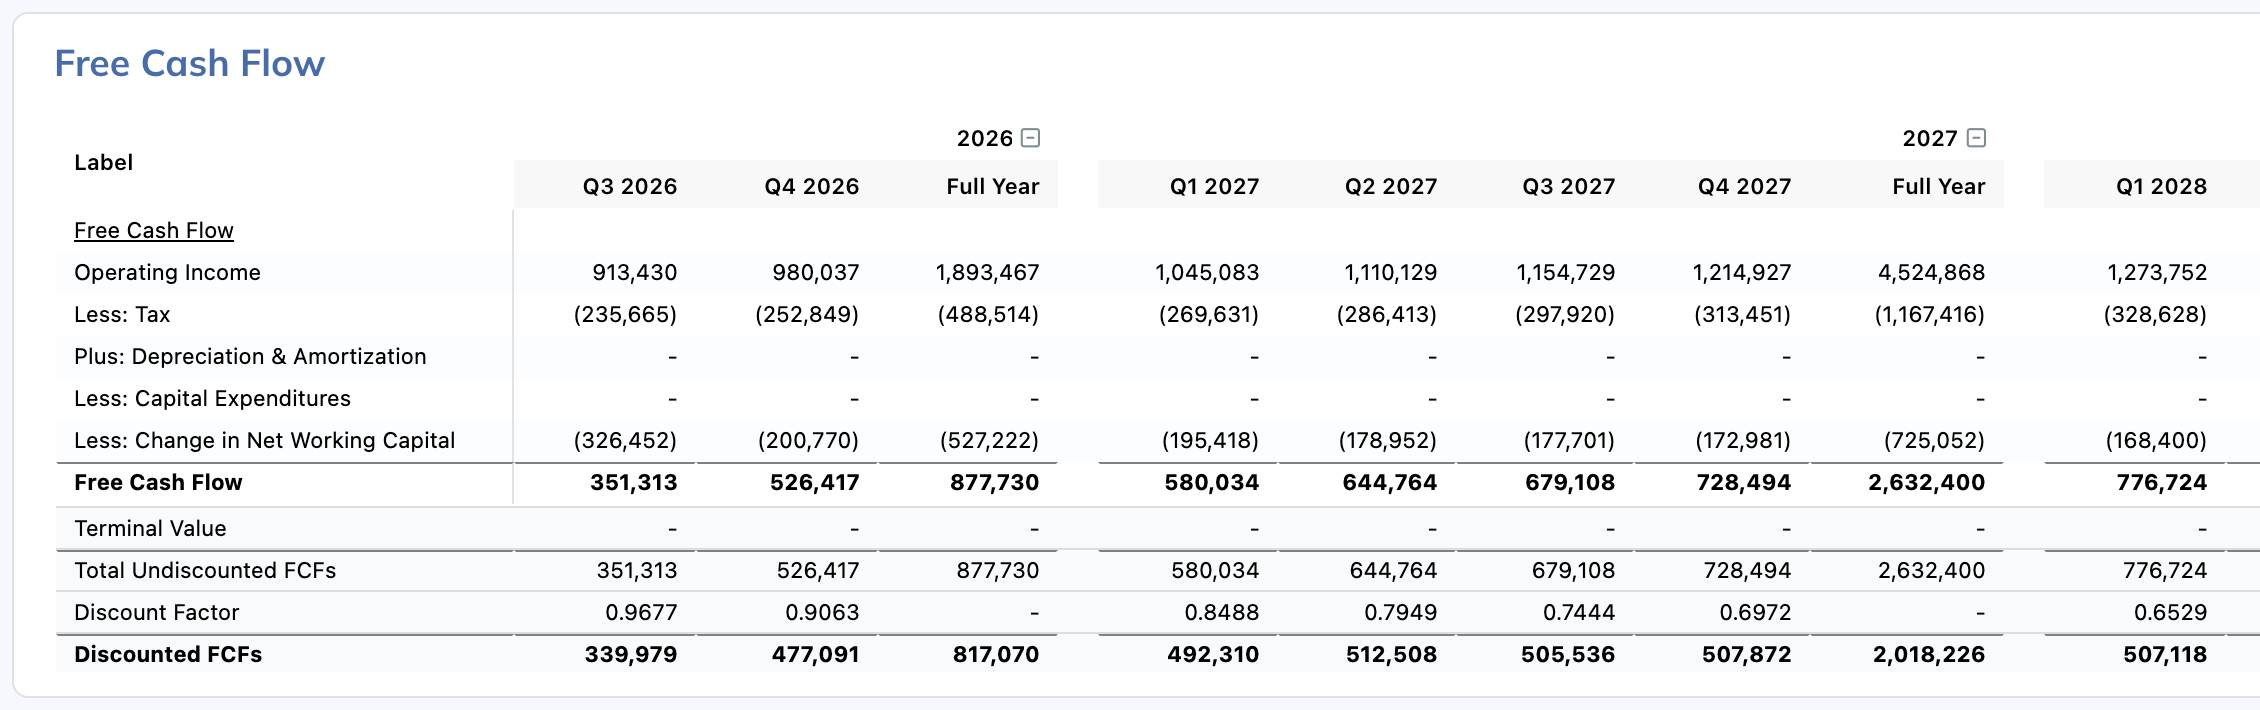
The Free Cash Flow Table is where you build up your free cash flow calculation across forecast periods, with columns grouped by fiscal year.
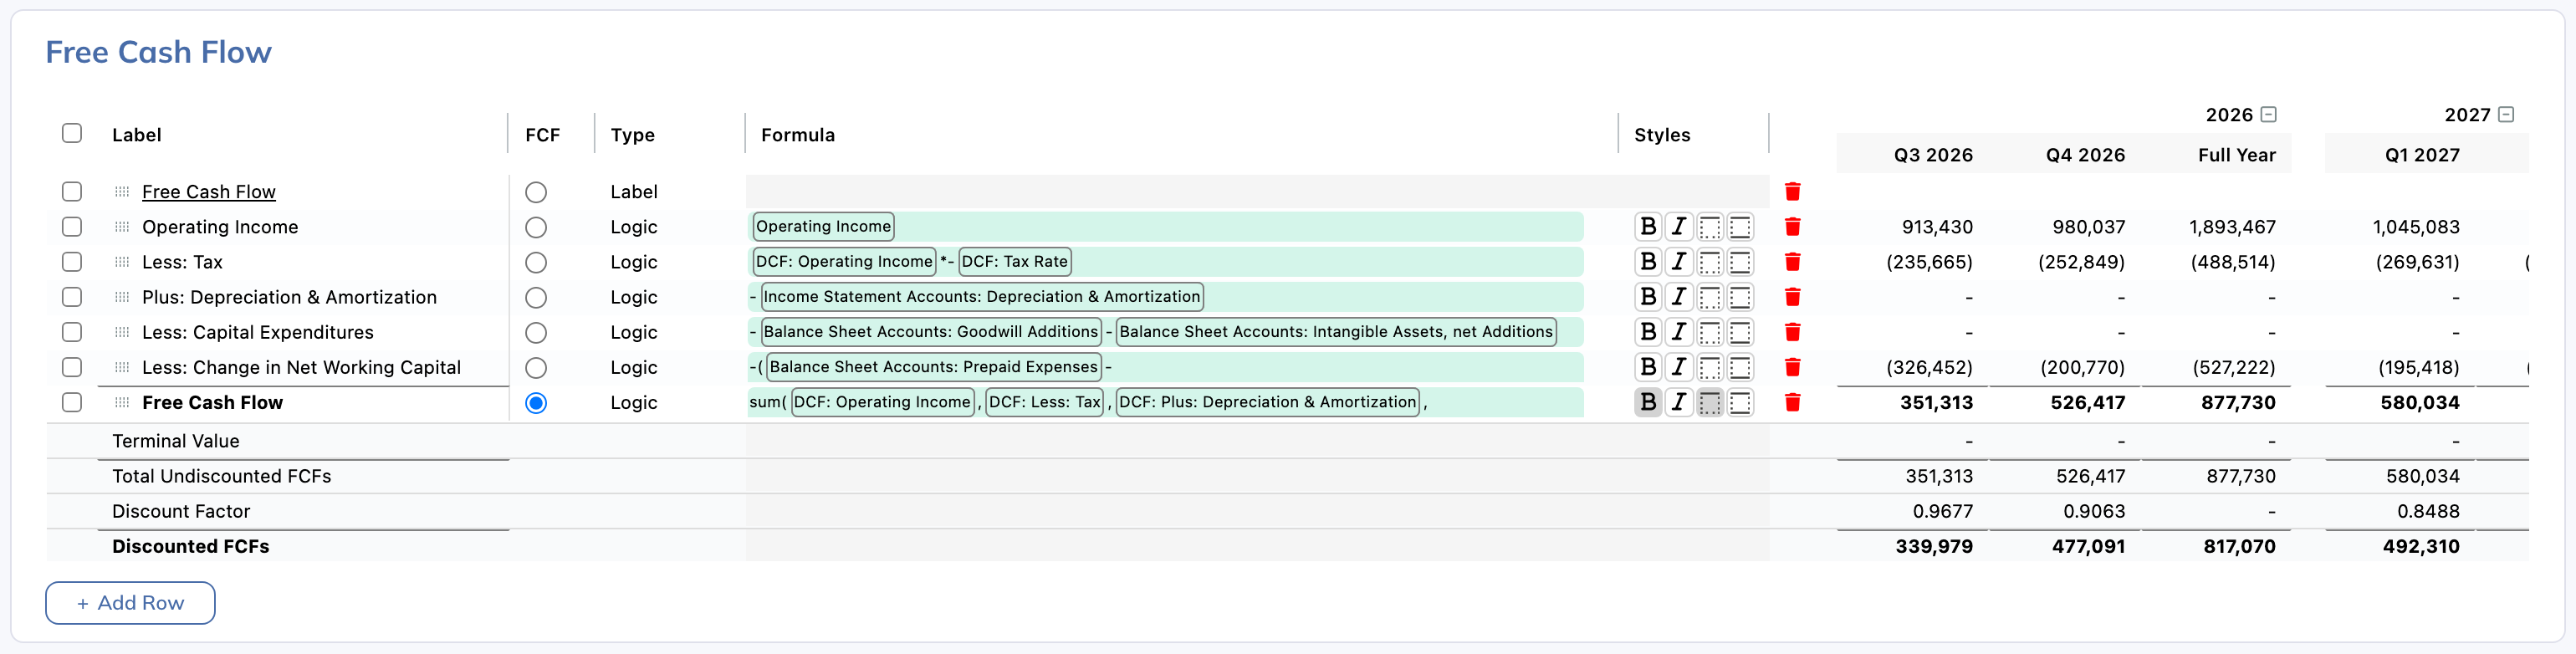
Edit / View Mode - toggle between edit mode (cells are editable, formulas can be modified) and view mode (read-only, shows computed values).
Model Structure & Navigation:
- Each row represents a line item in your free cash flow build-up (e.g. Revenue, EBITDA, Capital Expenditures, Free Cash Flow).
- Period columns show values for each forecast period, grouped under fiscal year headers.
- Pinned bottom rows are computed automatically and cannot be directly edited:
- Terminal Value - calculated from the terminal value method and parameters set in DCF Options.
- Total Undiscounted Cash Flows - sum of the selected FCF row values plus the terminal value in the final period.
- Discount Factor - the present value factor for each period based on the discount rate.
- Discounted Cash Flows - each period's undiscounted cash flow multiplied by its discount factor.
FCF Row Selector - click the radio button on any row to designate it as the free cash flow row used in the NPV calculation.
Add Row - click the "Add Row" button to add a new row to the Table.
Row Types & Formatting
Each row has a type that determines its behavior:
- Logic (default) - a calculated row. Values come from formulas or direct input.
- Label - a section header row for organizing your FCF build-up. Does not contain values.
- Spacer - a blank separator row for visual spacing.
- Header - a bold header row, similar to Label but with distinct styling.
Formatting options are available in edit mode via each row's Styles buttons:
- Bold / Italic - toggle text formatting.
- Top Border - add a top border to the row.
- Top & Bottom Border - add both top and bottom borders.
Right-click a row for the context menu, which offers Insert 1 Row Above, Insert 1 Row Below, and Delete Row.
You can reorder rows by dragging them to a new position in the Table.
Formula Editor
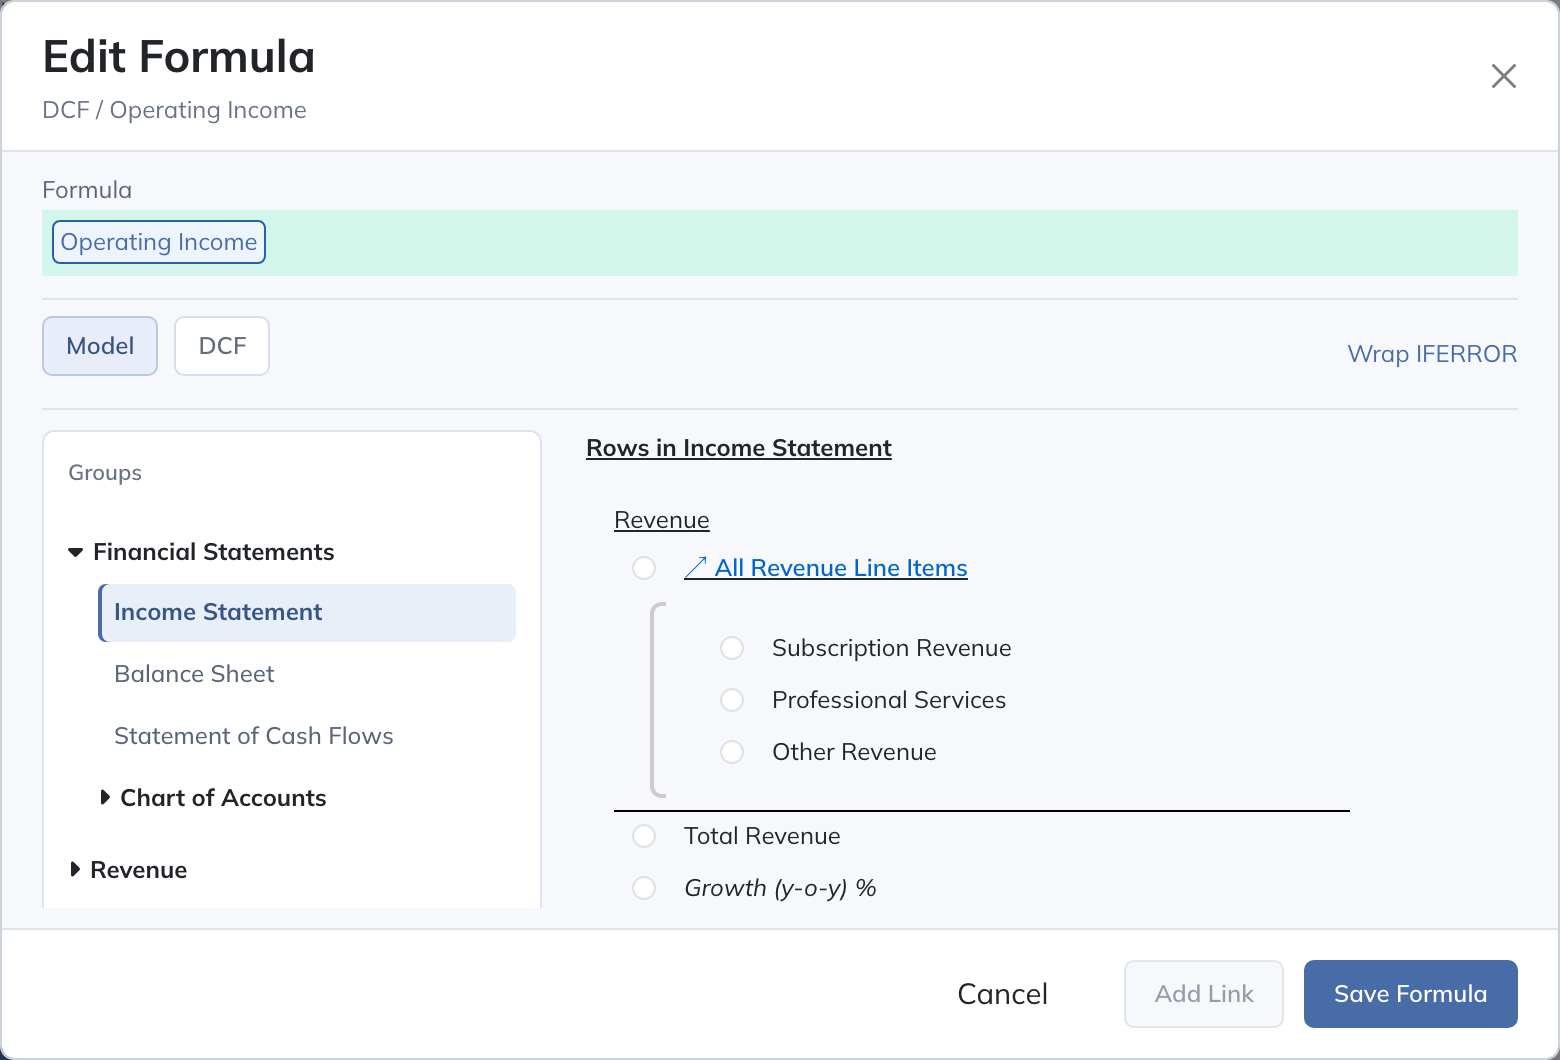
The formula editor works similarly to the one in Corporate Transactions. Click a cell in edit mode to open the formula editor for that row.
Use it to write formulas and insert linked references, which appear inline as readable tags.
Reference Tabs:
- Model - browse Views, Logic Rows, and Collection Tables from the selected Projection Set and entity, then select the value to reference. For the Exit Basis field, a period selector is also available to choose a specific period's value.
- DCF - choose DCF Options for scenario parameters such as Tax Rate, or Free Cash Flow for rows in the current DCF calculation.
Editor Actions:
- Add Link - insert a reference to a selected row at the cursor position.
- Save Formula - save the formula and recalculate values.
- Cancel - discard changes to the formula.
- Wrap IFERROR - wrap the entire formula in an IFERROR function to handle division-by-zero or other errors gracefully.
Check which Projection Set the DCF page is using. The FCF row selection determines the periodic cash flow used in NPV, while the terminal Basis formula determines the value multiplied by the Exit Multiple. These are separate choices.
NPV & Sensitivity Analysis
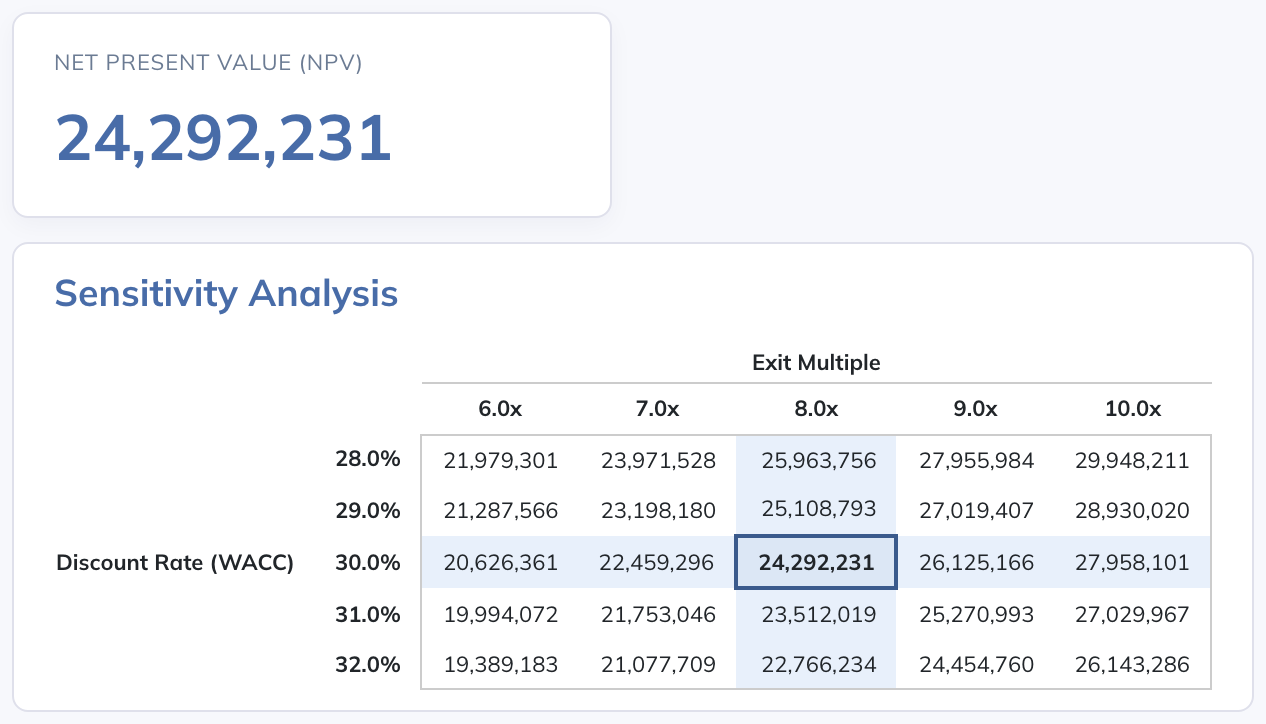
NPV Card - displays the computed Net Present Value in a large-format card. This is the sum of all discounted cash flows (including the discounted terminal value).
Sensitivity Table - a 5x5 matrix that shows how the NPV changes under different assumptions:
- Rows - vary the Discount Rate across five values centered on your current rate.
- Columns - vary the terminal value parameter (Exit Multiple or Terminal Growth Rate) across five values centered on your current setting.
- The cell corresponding to your current Discount Rate and terminal value parameter is highlighted.
- Negative NPV values are displayed in red.
Saving & Validation
Click "Save DCFs" to persist all changes. This saves all DCF scenarios and triggers recalculation. When there are no unsaved changes, the button shows "Data Saved".
A validation indicator (circular badge with "!") appears in the header when errors exist. Click it to open the Validation Errors modal, where errors are grouped by DCF scenario. For supported fields, you can click an error to jump directly to the relevant part of the DCF.
Common validation issues include missing formulas, invalid references, and incomplete DCF options.
History & Rollback
Click the clock icon in the header (or press "h") to open the History modal. It shows a table of prior saves with timestamp, user, and change note.
Click "See Changes" to review the operations performed in any save. Click "Apply Rollback" to load a previous version. If you already have unsaved changes, Modeloptic will ask for confirmation before discarding them. After a rollback, save again to persist the restored version.
Rollback applies to the selected DCF scenario. Save DCFs also saves pending edits to other scenarios. See Save History & Rollback for the shared workflow.
Excel Export
Use the export button in the header to generate an Excel version of your DCF valuations. If everything is already saved, the button reads "Generate Excel Model". If there are unsaved changes, it reads "Save & Generate Excel Model" and saves first.
The generated workbook contains one sheet per DCF scenario, including all rows, computed values, and the sensitivity table. See also Exporting to Excel for general Excel export information.