
Company Configuration
General Settings
Open the Configuration tab to set your company's name, time frame, currency, statement units, and chart of accounts. Click Save to save your changes.
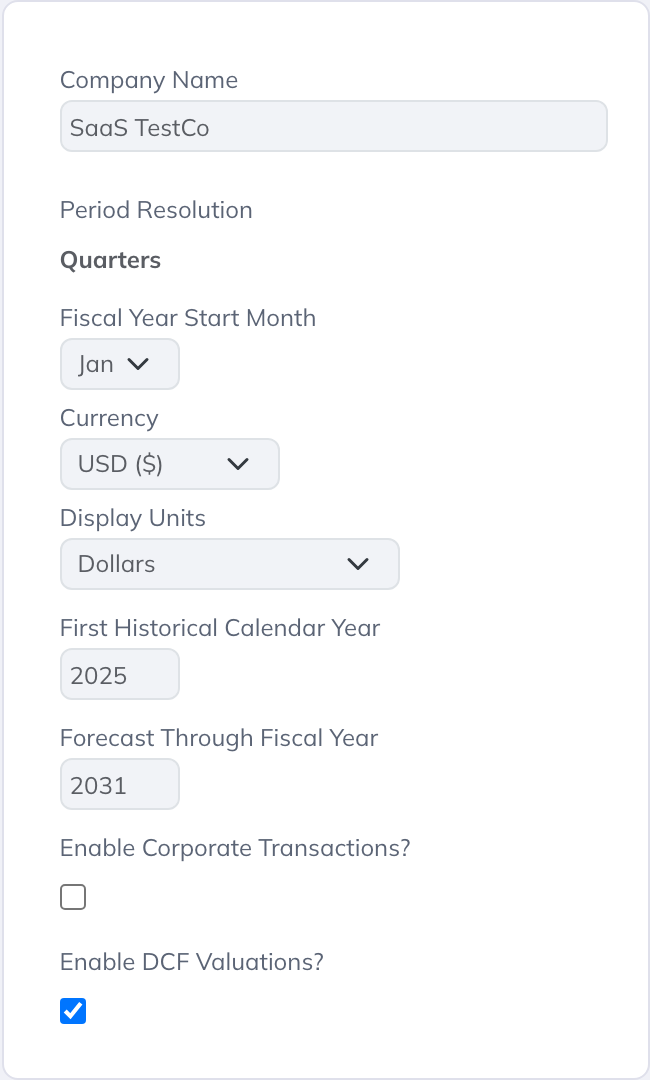
Company Name: The name displayed in Modeloptic and your Excel exports.
Time Frame
- Period Resolution: Displays the resolution selected when the company was created: Months, Quarters, or Years. This field is read-only. See Period Views for the available display options.
- Fiscal Year Start Month: Choose January for a calendar fiscal year; otherwise, choose the month your company's fiscal year begins. Changing this setting requires re-importing and re-forecasting company data.
- First Historical Calendar Year: The earliest calendar year of historical data to include.
- Forecast Through Fiscal Year: The last fiscal year to forecast. This setting is available when the company includes projections.
Set the Latest Historical Period on the Historical Data tab. The period selector follows the company's Period Resolution.
Optional Features
Users with AI access can enable these features in Configuration:
- Enable Corporate Transactions?: Adds the Transaction tab after saving. See Corporate Transactions for setup and modeling instructions.
- Enable DCF Valuations?: Adds the DCF tab after saving. See DCF Valuations for setup and valuation instructions.
Currency & Display Units
Set currency and statement units before importing historical data or building your model where possible.
- Currency: Sets the presentation label and symbol used on currency-formatted values, statement units labels, and Excel exports. It does not perform exchange-rate conversion. See Currency Conversion for converting imported financial data.
- Display Units: Sets the denomination in which Income Statement, Balance Sheet, and Statement of Cash Flows amounts are entered and stored: whole currency units, thousands, or millions. Accounting-system imports are scaled into the selected units.
Operating values such as headcount, prices, and sales volumes retain their own units. Convert an operating result only if its units differ from the financial statement units. If the units already match, reference the result directly without scaling it.
Example: Converting Operating Values to Thousands
An operating Logic Row returns revenue of 25,000 in whole dollars. If your financial statements use thousands, divide that result by 1,000 in the formula feeding the Income Statement. The statement receives 25, representing $25,000. If the operating result is already expressed in thousands, reference it directly without dividing again.
Changing Display Units
Changing Display Units does not convert existing numbers. Financial statement values, uploaded historical data, and accounting transactions keep their numbers and are interpreted in the new units. Review affected values and formulas, and refresh every Accounting Connection; connections show a critical error until refreshed.
Chart of Accounts
Define the accounts and sections used in your financial statements on the Configuration tab. Your Modeloptic chart of accounts can summarize a more detailed accounting-system chart: for example, Taxis, Flights, and Hotels can map to one Travel account. Set up that mapping on the Historical Data tab.
Scope of changes: Statement structure changes apply across all Projection Sets, including locked and archived sets. Check the connected statements after changing accounts.
Adding and Organizing Accounts
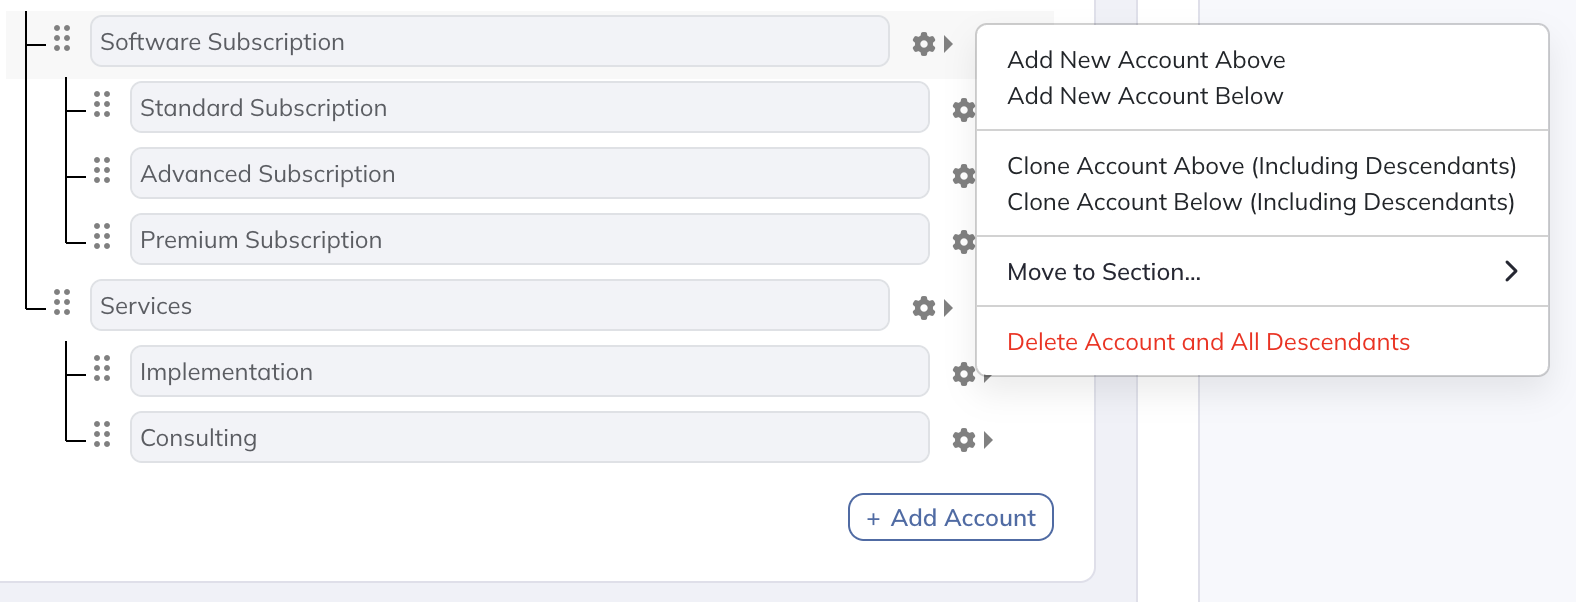
- Add: Click + Add Account in the relevant section. To insert an account next to an existing one, use its gear menu and choose Add New Account Above or Add New Account Below.
- Nest or reorder: Drag the grip beside an account to change its position or level in the hierarchy. Use a section's grip to reorder sections.
- Clone: Use the gear menu's Clone Account Above or Clone Account Below option. Cloning a parent includes its descendants.
- Move: Choose Move to Section... in the gear menu to move an account to another section.
- Delete: Choose Delete Account or, for a parent, Delete Account and All Descendants in the gear menu.
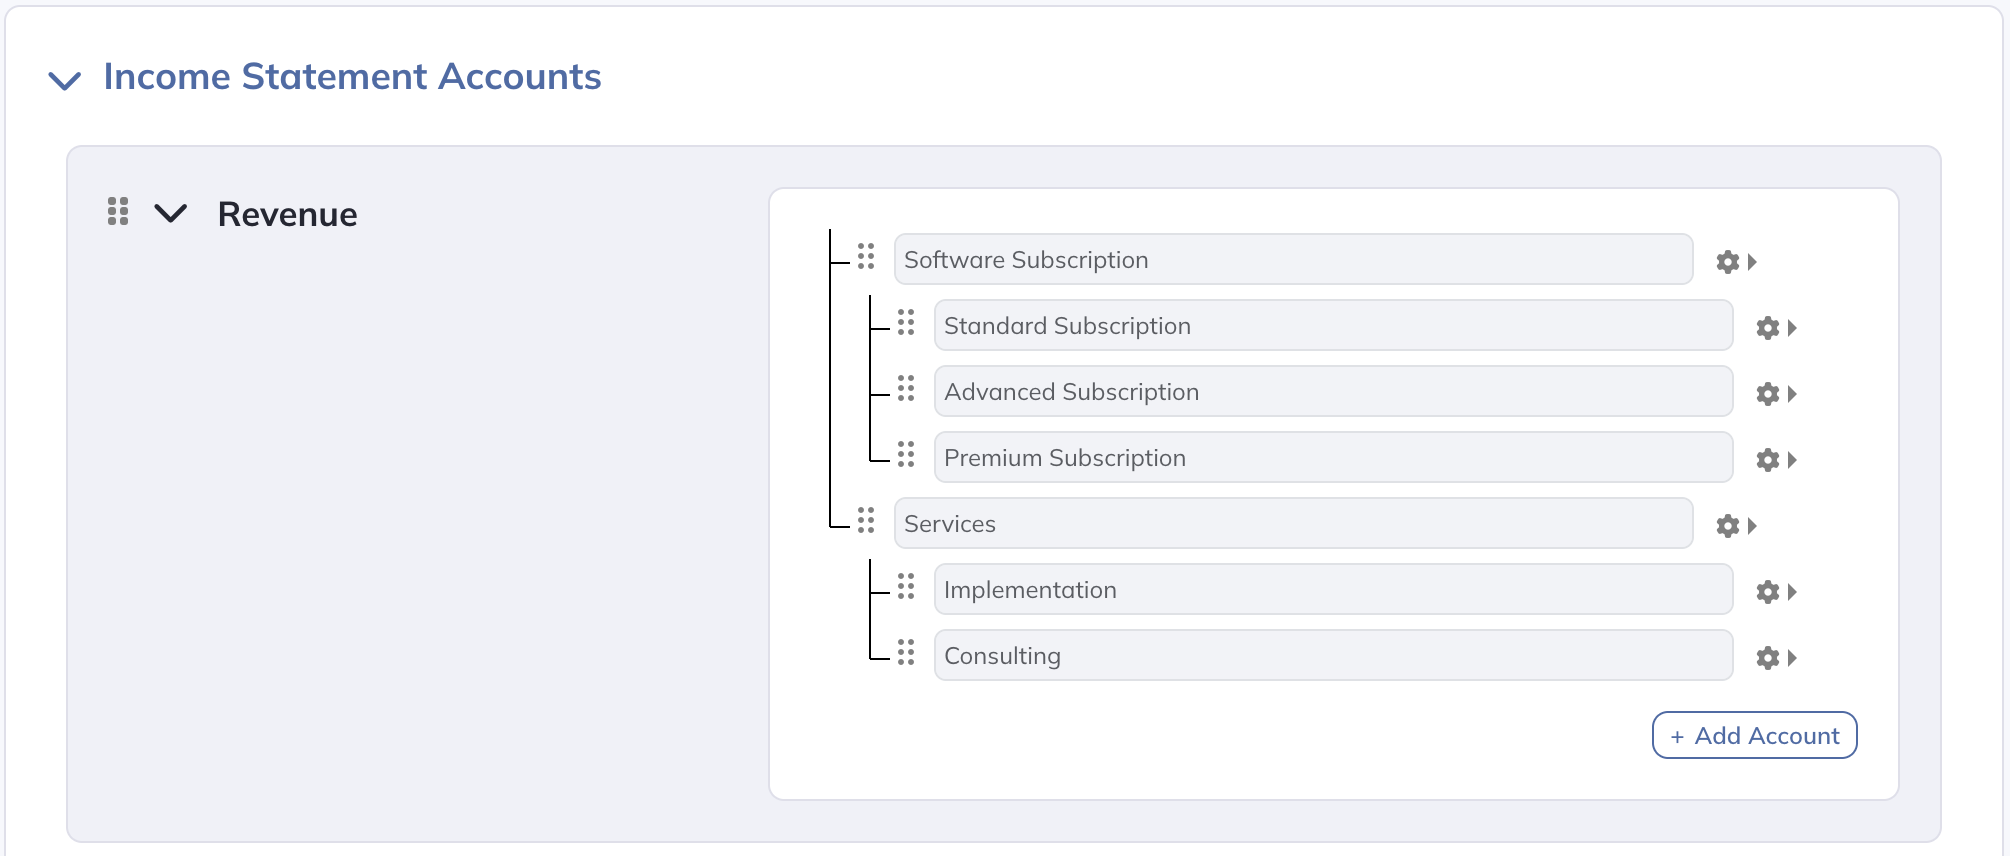
Income Statement
The standard sections are Revenue, Cost of Goods Sold, Operating Expenses, Other Income / (Expense), and Tax. Add and nest accounts within these sections, rename or reorder sections, or click + Add New Section to add a section.
Balance Sheet
Add and nest accounts within Current Assets, Non-Current Assets, Current Liabilities, Non-Current Liabilities, and Equity. Each account's type determines its available forecast options and statement links, as described in Balance Sheet Account Types & Links.
Statement of Cash Flows
Add accounts within Cash Flow from Operations, Cash Flow from Investing, and Cash Flow from Financing. The account controls work the same way as on the other statements. Create the accounts you need here before linking Balance Sheet movements to them.
Income Statement Account Types
On the Configuration tab, expand Income Statement Accounts, then expand the section containing the account. Interest and D&A checkboxes appear directly below each account name when the account has no child accounts.
The example below shows the Other Income / (Expense) section, with Interest Expense checked beneath the Interest Expense account.
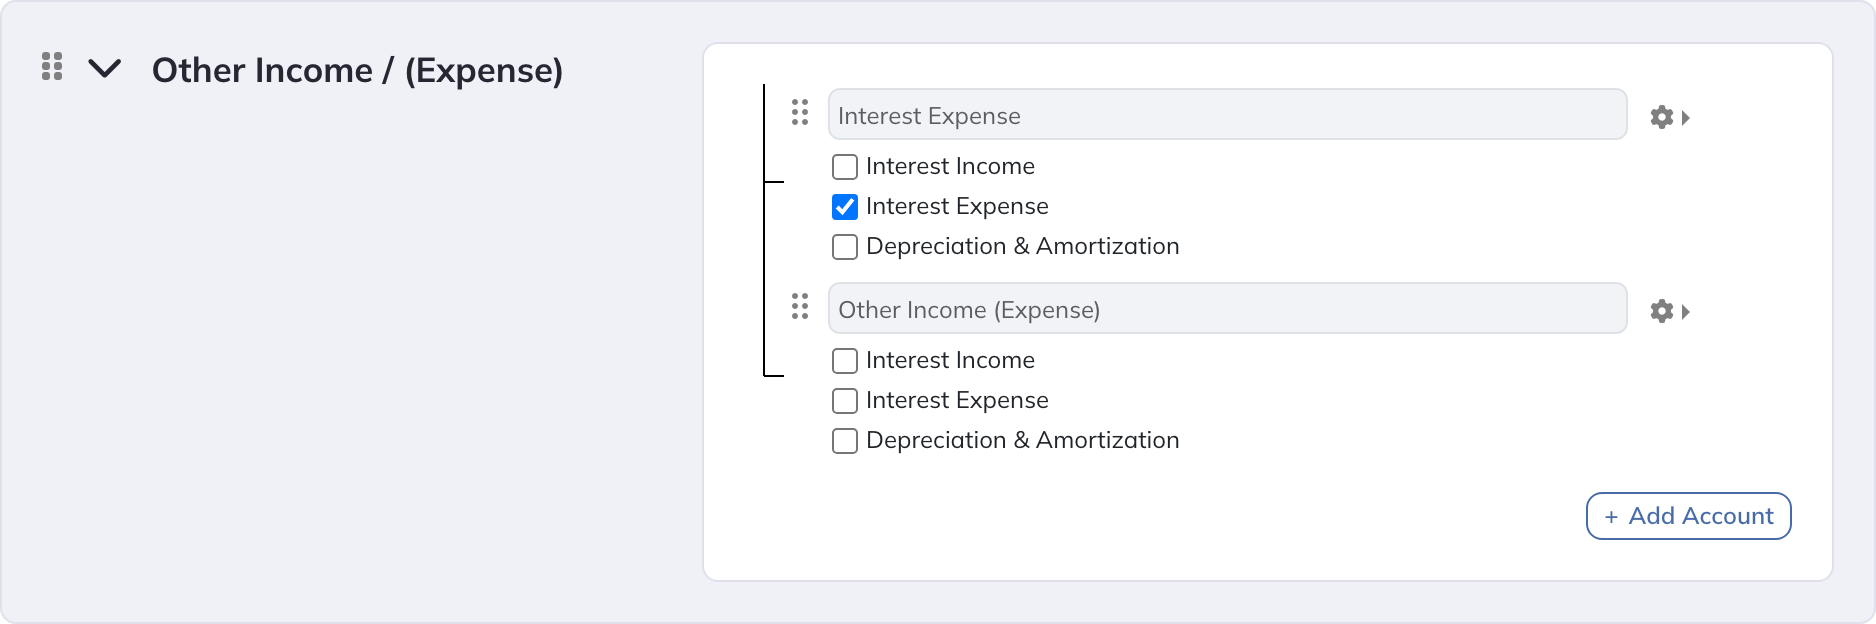
The available checkboxes depend on the section:
| Account flag | Available in | Effect |
|---|---|---|
| Interest Expense | Cost of Goods Sold, Operating Expenses, and Other Income / (Expense) | Receives interest expense forecast on linked Balance Sheet accounts, such as Debt, rather than an independent Income Statement forecast. |
| Depreciation & Amortization | Cost of Goods Sold, Operating Expenses, and Other Income / (Expense) | Receives D&A forecast on linked Balance Sheet accounts, such as PP&E, rather than an independent Income Statement forecast. |
| Interest Income | Other Income / (Expense) | Adds the % of Cash Balance forecast option on the Model tab and identifies interest income to subtract from net income when calculating EBITDA in reports. |
After flagging the interest-expense and D&A accounts, choose them as destinations in the Balance Sheet links below.
Balance Sheet Account Types & Links
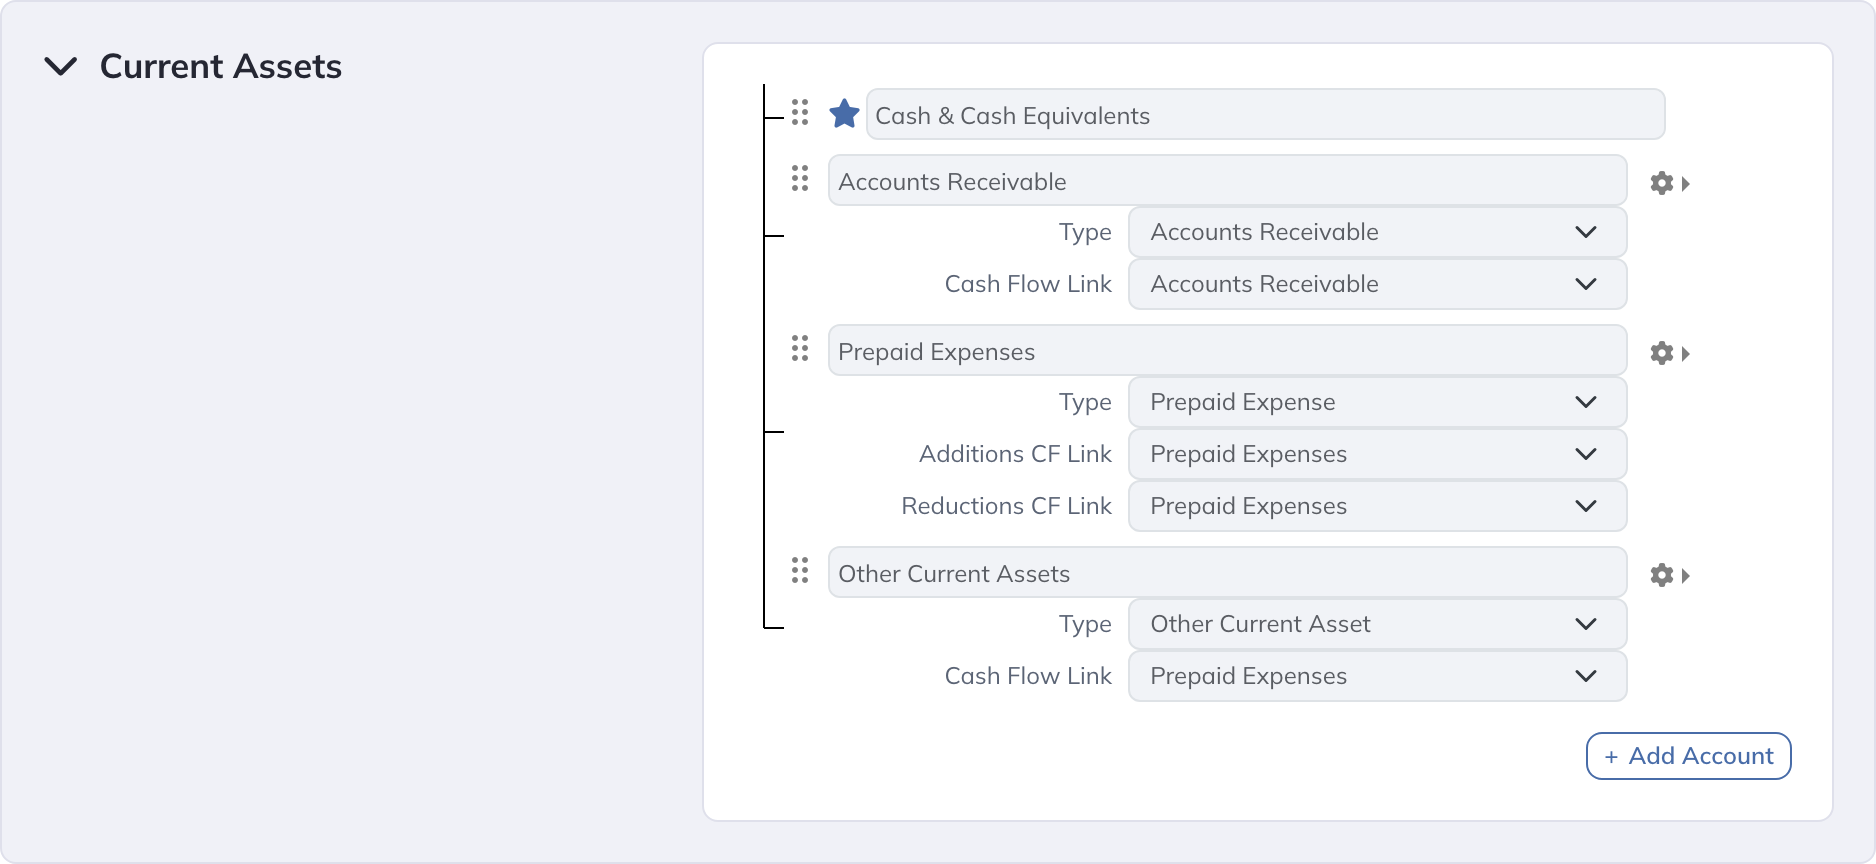
On the Configuration tab, expand Balance Sheet Accounts, then expand the section containing the account, such as Current Assets. The Type and statement-link selectors appear directly below the account name. Configure them in the order described below.
Choose the Account Type
Select Type to set the available forecast methods and statement links. The choices depend on the Balance Sheet section: for example, Accounts Receivable is available under Current Assets, while Property, Plant, & Equipment is available under Non-Current Assets.
In the Current Assets section below, the Accounts Receivable account has its Type set to Accounts Receivable, with its Cash Flow Link directly underneath.
Set the Cash Flow Links
Choose the Statement of Cash Flows account that receives each applicable movement. The account type determines which controls appear:
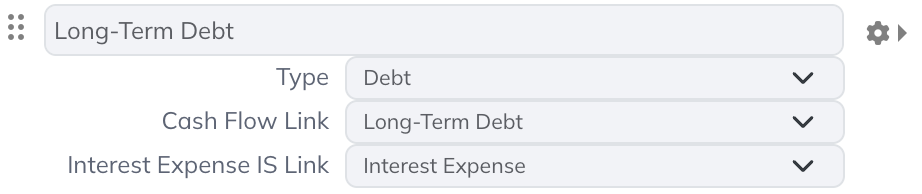
- Cash Flow Link: Routes the account's net change to the selected cash-flow account.
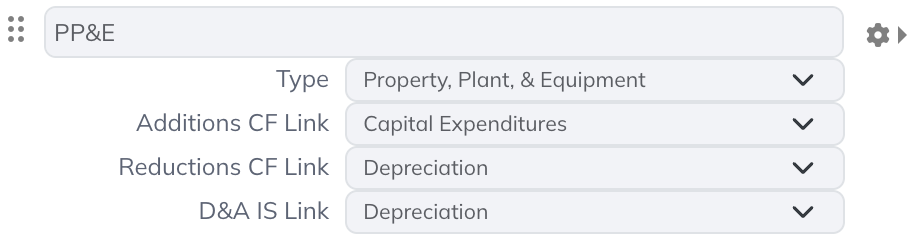
- Additions CF Link: Routes additions to the selected cash-flow account, such as capital expenditures for PP&E.
- Reductions CF Link: Routes reductions to the selected cash-flow account, such as the depreciation adjustment for PP&E.

Set the Income Statement Links
D&A IS Link: For PP&E, Intangible Asset, and Goodwill accounts, select the Income Statement account that receives the forecast depreciation or amortization. The list contains accounts flagged Depreciation & Amortization.
Interest Expense IS Link: For Debt and Capitalized Financing Fee accounts, select the Income Statement account that receives the forecast interest expense or financing-fee amortization. The list contains accounts flagged Interest Expense.
Customizing Financial Statements
Use Configuration to change accounts, their hierarchy, Balance Sheet account types, and statement links. These settings determine how the three statements calculate and connect.
Use the Income Statement View on the Model tab for permitted presentation changes, including labels, ordering, sections, and calculated display rows. Advanced Mode exposes the available controls. Total Revenue, Tax, and Net Income are protected; Balance Sheet and Cash Flow structural rows are managed from Configuration.
An EBITDA or Adjusted EBITDA display row can show a calculation without changing net income. An accounting adjustment that must affect net income, the Balance Sheet, and cash flow needs an actual Income Statement account and the appropriate statement links. Adding a display row alone does not make that adjustment flow through the model.
Multi-Entity Configuration
Use the Entity Configuration panel on the Configuration tab to manage the entity structure of a multi-entity instance. See Multi-Entity Features for how the structure affects forecasting, historical data, and reporting.
An Admin or Super-Admin on the instance can add, remove, rename, and reorder entities directly. Promote a single-entity instance from the Company Selection Lobby.
The chart of accounts, fiscal year, and model time frame are shared across the entities in a multi-entity instance. Editing these settings on Configuration affects the instance, even when you are viewing one entity. See Universal Settings Across Entities for the shared scope.
History & Rollback
Click the clock button, Config Save History, to review Configuration saves. Use Apply Rollback to load the selected version, review the restored settings, then click Save. See Restoring a Saved Version for the walkthrough.
Configuration rollback restores saved shared definitions, the model time frame, name, feature settings, Currency, Display Units, and saved currency-conversion rates where present. Shared-definition changes can affect multiple Projection Sets. Entity structure stays unchanged.
If the selected version has no explicit Currency or Display Units setting, it restores the defaults of USD and whole units. A Display Units change reinterprets existing numbers; it does not convert them. Review the confirmation and refresh accounting connections when validation requires it.